ANIMATION
After the building, character and transportation done now we need to combine it all together in one task and make it move. First I need to do a housing. Because my building are too big therefor I make another house that is smaller than my building and I put it around my building.
I make the house very simple.
This the look of my housing and it also have a name 'Taman Mulia Utama'. I copy all the small house and put it along the road and I want to put my car at the road moving to the my building.
This the look of my housing withe car. Now I just need to move the car and it will be my animation.
Showing posts with label 3D modelling object and environment. Show all posts
Wednesday, June 10, 2015
3D MODELING FOR OBJECT AND ENVIRONMENT
TRANSPORTATION ( PART 2)
Start to design my car at the maya.
First I start wit putting the suitable polygon for my car like the shape of rectangle. After that I make a hole for the window.
Other than that I also make a hole for the space of the tires for my car. After that I stat design the look of my car from the front
I make a lamp for my car and also I make the cap for the engine. I also make a bumper for my car so it look nice. Other than that I also make a tires for my car and I think it look nice and sweet..
I also make a glass for the car window.
After finish the design now I start to color my car and find the suitable texture for my car. Every part of the car have a difference texture for example the texture of the tires are not same with the texture the body of the car. I also play with the transparency for the window glass to make it look nice and suitable for the character of the glass.
After finish all the step I need to render it
I put some background for my car so it will look like moving at the road.
Start to design my car at the maya.
First I start wit putting the suitable polygon for my car like the shape of rectangle. After that I make a hole for the window.
![]() |
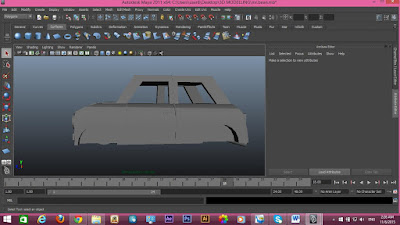
Picture 1 : The structure of the car |
![]() |
Picture 2 : Side view of the car after putting the tires and designing the front part of the car |
![]() |
Picture 3 : View from the front of the car |
![]() |
Picture 4 : Side view of the car after putting the glass for the window. |
After finish the design now I start to color my car and find the suitable texture for my car. Every part of the car have a difference texture for example the texture of the tires are not same with the texture the body of the car. I also play with the transparency for the window glass to make it look nice and suitable for the character of the glass.
![]() |
Picture 5 : View from the front after put the color to the car |
![]() |
Picture 6 : View from the side after put the color to the car |
![]() |
Picture 7 : The car are ready to go..vroommm..vrooommm,.. |
I put some background for my car so it will look like moving at the road.
3D MODELLING FOR OBJECT AND ENVIRONMENT
TRANSPORTATION
After finish designing the character now we need to design a transportation. First I think I want to design a lorry but after that I change my mind and start to designing a car. I have an experiences in designing a character therefor I think it easy for me to do this task.
The step still same first I need to do a sketch of my car and put it in illustrator and after finish just put the image to the maya and start designing the car.
![]() |
Picture 1 : Front view of my car |
![]() |
Picture 2 : Side view of my car |
3D MODELLING FOR OBJECT AND ENVIRONMENT
After finish the tracing now I just need to put all the picture view from the front and view from the side to the maya and start to put the polygon and start to shape it
![]() |
Picture 1 : Put the image in the maya |
![]() |
Picture 2 : start putting the polygon |
![]() |
Picture 3 : Start shaping the body of the character |
![]() |
Picture 4 : joint the head and the body of the character |
![]() |
Picture 5 : Design the glasses for the character |
![]() |
Picture 6 : Put the eye and the glass for the glasses |
After that I create the hand and the leg for my character and joint them together and this is my character and I also give name to my character "LensPic" that the name of my character.
![]() |
Picture 7 : My character are finish and this is LensPic |
3D MODELLING OBJECT AND ENVIRONMENT
CHARACTER DESIGN
I need to do the character design a simple character. I think it not to difficult because the step was same with my first task that is make a building
First I need to draw or do a sketch about the character that I want to make after that I just need to transfer it and trace it in illustrator and also put some color to it.
Picture 1 and 2 I do it using the illustrator
I need to do the character design a simple character. I think it not to difficult because the step was same with my first task that is make a building
First I need to draw or do a sketch about the character that I want to make after that I just need to transfer it and trace it in illustrator and also put some color to it.
![]() |
Picture 1: My sketch for my character and also the expression, position and view from all side of the character Picture taken using Aisyah phone camera. |
![]() |
Picture 2 : The view of my character from the front Picture taken using Aisyah phone camera |
![]() |
Picture 3 : The view of my character from the sides. Picture taken using Aisyah phone camera. |
Monday, April 6, 2015
3D MODELLING FOR OBJECT AND ENVIRONMENTS
BUILDING AN ENVIRONMENTS(PROCESS)
For this week we need to decide which image that we want to
make as our building model and put it in maya to make it look 3D and this is
the image that I choose to develop more to make it look real. In maya we only
need the top view to put the polygon according to our drawing. Like what I do
is I just use the basic polygon such as cylinder and rectangle to make my
model. This is the first step that I do to make it look 3D.
First I take the drawing that I have trace in illustrator
and put it in the top view
After that I start to put the polygon shape and start design
it
3D MODELING FOR OBJECT AND ENVIRONMENT
BUILDING AND ENVIRONMENT (PROCESS)
We are requiring doing sketches about designing a building
with the theme of ‘corner’. In this task I do some of the sketches it could be
anything as long it in the theme of corner and this is my sketches:
3D MODELING FOR OBJECT AND ENVIRONMETS
BUILDING AND ENVIRONMENT ( PROCESS)
After do some of the sketches we need to trace it into
photoshop or illustrator to make it look more clean and clear. This is some of
my work.
This is the view from the top of my building
This is the view from the side of my design.
3D MODELLING FOR OBJECT AND ENVIRONMENTS
BUILDING AN ENVIRONMENTS (PROCESS)
I added some additional shape like the window to the
building to make it look realistic.
I also add the gate for my building
Process designing the gate
I create the furniture for the outside of the building. I
make a chair for the people to sit and relax.
I also make a tree to make it look more ecosystem. Other than that I also make the lamp for my building.
3D MODELLING FOR OBJECT AND ENVIRONMENTS
BUILDING AN ENVIRONMENTS (PROCESS)
After all designing process was finish now I start to put
some of the texture and try put the color to my building
First I want to make my building look like a glass building
and I play with transparency to make it look like a glass but after that I
change my mind and make it look like the normal building.
Sunday, April 5, 2015
3D MODELLING FOR OBJECT AND ENVIRONMENTS
BUILDING AN ENVIRONMENTS (PROCESS)
After the experiment with color and texture was finish now
in this week I play with light. I start to look where I want to put the light
to make my model look nice. I put the light at the left on the corner to make
it look like the light of the sun or the moon.
After that I also put the light on my lamp there is six of
lamp. I put the light so it look like the real lamp.
3D MODELLING FOR OBJECT AND ENVIRONMENTS
BUILDING AND ENVIRONMENTS (PROCESS)
Last of this task after all are finish design and color now
I can start to render my work. This is the last step of this task and this is
the result.
view from front:
View from side:
View from top back:
View from top:
Subscribe to:
Posts (Atom)